AOS TinyOS Tutorial
Reference Material
TinyOS
NesC
TOSSIM
Misc
- tos/interfaces - the standard interfaces of TinyOS
- tos/system - the standard components (implementations of the interfaces)
- apps/ - a number of example applications that ship with TinyOS
Suggestions
- Study the examples provided here and in the apps directory
- Go through the tutorials 1-5, skip all material related to programming
hardware and the GUI interface for TOSSIM
- As you are not the first person to write programs for TinyOS, search the mailing list archives of the TinyOS community for solutions to problems you encounter
- Have handy the NesC Language Reference Manual and the TOSSIM User Manual when working on the project
- Keep in mind that all memory is statically allocated, this greatly impacts the design of applications for the platform
- Follow the KISS principle in designing and implementing your project - Keep It Simple S******
Skeleton Code Example
For the Advanced Operating Systems projects you will not
need to create reusable components. You will only need to
create a top-level configuration file, a top-level implementation
module and a Makefile. The following illustrates a minimal
valid example of each file. Although these sources are valid, they do
not do anything useful.
top-level configuration file (Skeleton.nc)
|
configuration Skeleton {
}
implementation {
	components Main, SkeletonM;
	Main.StdControl -> SkeletonM.StdControl;
}
|
In the above file we see that the minimal application uses two components, Main and
SkeletonM. Main is part of the framework provided by TinyOS. SkeletonM is the top-level
implementation module. The line Main.StdControl -> SkeletonM.StdControl; links
the StdControl interface provided by the SkeletonM module to Main's StdControl.
top-level implementation module (SkeletonM.nc)
|
module SkeletonM {
	provides {
		interface StdControl;
	}
}
implementation {

	command result_t StdControl.init() {
		return SUCCESS;
	}
	command result_t StdControl.start() {
		return SUCCESS;
	}

	command result_t StdControl.stop() {
		return SUCCESS;
	}
}
|
In the above file we see that the module declares that it provides the StdControl interface. In the
implementation block we see that three command implementations. As the module declares that it provides the
StdControl interface, the module must provide an implementation of the StdControl interface. All standard
TinyOS interfaces can be found in the tos/interfaces directory of the TinyOS tree.
Makefile
|
COMPONENT=Skeleton
include ../Makerules
|
The above file defines the component that will be built using the make-based TinyOS build system. The second line assumes
that these files reside in subdirectory of apps in the TinyOS tree (i.e. apps/Skeleton).
Timed LEDs Code Example
This code example demonstrates using the Timer parameterized interface and the
Leds interface.
top-level configuration file (TimedLed.nc)
|
configuration TimedLed {
}
implementation {
	components Main, TimedLedM, TimerC, LedsC;
	Main.StdControl -> TimedLedM.StdControl;
        Main.StdControl -> TimerC.StdControl;
	//The Timer component is an example of a parameterized component.
	TimedLedM.RedTimer -> TimerC.Timer[unique("Timer")];
	TimedLedM.GreenTimer -> TimerC.Timer[unique("Timer")];
	TimedLedM.YellowTimer -> TimerC.Timer[unique("Timer")];

	TimedLedM.Leds -> LedsC.Leds;

}
|
In the above code, notice the multiple mappings of the TimerC component. TimerC
provides and implementation of the Timer interface. The implementation is parameterized, allowing
a convenient means of mapping an implementation to multiple instances of the component. The Simple Message Example (below)
demonstrates another parameterized component.
top-level implementation module (TimedLedM.nc)
|
module TimedLedM {
	provides {
		interface StdControl;
	}
	uses {
	    //we define which components our implementation will
	    //use.  Note that we alias the Timer interface to allow for
	    //three distinct instances of the component.
	    interface Timer as RedTimer;
	    interface Timer as GreenTimer;
	    interface Timer as YellowTimer;

	    interface Leds;
	}
}
implementation {

	command result_t StdControl.init() {
	    //initializes the Leds component
	    call Leds.init();
	    return SUCCESS;
	}
	command result_t StdControl.start() {
	    call RedTimer.start(TIMER_REPEAT,1024);
	    call GreenTimer.start(TIMER_REPEAT,2 * 1024);
	    call YellowTimer.start(TIMER_REPEAT,3 * 1024);
	    return SUCCESS;
	}

	command result_t StdControl.stop() {
	    call RedTimer.stop();
	    call GreenTimer.stop();
	    call YellowTimer.stop();
	    return SUCCESS;
	}


	//event handlers for the timers
        event result_t RedTimer.fired() {
	   call Leds.redToggle();
	   return SUCCESS;
        }

        event result_t GreenTimer.fired() {
           call Leds.greenToggle();
           return SUCCESS;
        }

        event result_t YellowTimer.fired() {
           call Leds.yellowToggle();
           return SUCCESS;
        }
}
|
The uses block lists the interfaces that
are used by the module. Of interest is the method of aliasing an interface to allow for the use of multiple instances of
a component. The line interface Timer as RedTimer; declares that the implementation module will use an instance
of a component that implements the Timer interface using the name RedTimer. In the preceding configuration
file TimedLed.nc we saw that RedTimer was mapped to a parameterized instance of TimerC. This is a
common implementation pattern in TinyOS when more than one instance of a component is to be used.
In the implementation block we have the command definitions required by the StdControl interface. In the
StdControl.init() command we invoke a command the Leds.init() command. That is to say, we invoke the init()
command that is provided by the component that provides the Leds interface. In this case, we are invoking the command on the LedsC
component. This component was mapped to the TimedLedM.Leds interface in the TimedLed.nc configuration file using the line
TimedLed.Leds -> LedsC. This is a key point. In the implementation module file you either will provide an interface
(typically only StdControl when implementing a top-level module) or you will use one or more components provided by TinyOS to implement
your programs logic. In your implementation file you specify which interfaces you will need to use. In the configuration file you specify which
component implementating the interface you will be using. This is called wiring.
This implementation also contains three event handlers for the event fired() that is declared in the Timer interface. Remember, you
can find the definition of interfaces in the tos/interfaces directory. Most events in TinyOS are used as callback functions for split-phase operations. For example, in the StdControl.start() command the RedTimer.start(...) command is invoked. After the specified amount of
time passes, a lower-level component signals the event RedTimer.fired(). In the intervening time (between the invocation of the command and
the signalling of the event) other code may be executed, although that is not well demonstrated in the above program. It is your responsibility to provide
the declared event handlers in all interfaces that your implementation uses. We will see more event handlers in the Simple Messaging example below.
Makefile
|
COMPONENT=TimedLed
include ../Makerules
|
The above file defines the component that will be built using the make-based TinyOS build system. The second line assumes
that these files reside in subdirectory of apps in the TinyOS tree (i.e. apps/TimedLed).
So what does TimedLed do?
TOSSIM Debug Statements
In this section a simple example of using TOSSIM debug statements is provided. For a detailed
description see the TOSSIM User Manual.
TimedLedM.nc with TOSSIM debug statements
|
module TimedLedM {
	provides {
		interface StdControl;
	}
	uses {
	    interface Timer as RedTimer;
	    interface Timer as GreenTimer;
	    interface Timer as YellowTimer;

	    interface Leds;
	}
}
implementation {

	command result_t StdControl.init() {
	    call Leds.init();
	    dbg(DBG_USR1,"TimedLed initialized\n");
		return SUCCESS;
	}
	command result_t StdControl.start() {
	    call RedTimer.start(TIMER_REPEAT,1024);
	    call GreenTimer.start(TIMER_REPEAT,2 * 1024);
	    call YellowTimer.start(TIMER_REPEAT,3 * 1024);
	    dbg(DBG_USR1,"TimedLed started\n");
		return SUCCESS;
	}

	command result_t StdControl.stop() {
	    call RedTimer.stop();
	    call GreenTimer.stop();
	    call YellowTimer.stop();
		return SUCCESS;
	}


        //event handlers for the timers
        event result_t RedTimer.fired() {
	   dbg(DBG_USR1,"RedTimer.fired()\n");
	   call Leds.redToggle();
	   return SUCCESS;
        }

        event result_t GreenTimer.fired() {
          dbg(DBG_USR1,"GreenTimer.fired()\n");
          call Leds.greenToggle();
          return SUCCESS;
        }

        event result_t YellowTimer.fired() {
          dbg(DBG_USR1,"YellowTimer.fired()\n");
          call Leds.yellowToggle();
          return SUCCESS;
        }
}
|
In the above, you see lines such as DBG(DBG_USR1,"some string literal\n");. These lines cause TOSSIM to
output the string literal provided to the console if the DBG environment variable includes the usr1. Again,
this is explained in detail in the TOSSIM User Manual. You can use debug
statements to verify the proper functioning of your code or to troubleshoot your code in an ad hoc manner.
What will be printed to the TOSSIM console assuming the DBG environment variable is set to "usr1"?
Compiling and Simulation
Compiling TimedLed
The following assume that you have installed TinyOS using the Windows installer. The commands shown are executed from within a Cygwin Bash shell.
From the apps/TimedLed subdirectory, the following command will compile the TimedLed application to run in TOSSIM:
make pc
This will produce the following output:
You may or may not receive the warnings -- but you must see compiled TimedLed to build/pc/main.exe. Notice that the binary
was placed in build/pc/main.exe.
Setting the DBG environment variable
Before running TimedLed in TOSSIM you must set the DBG environment variable. The following command will
output DBG_USR1 debug statements and display the state of the LEDs:
export DBG=led,usr1
See the TOSSIM User Manual for more details.
Running TimedLed in TOSSIM
The following command will run TimedLed on one node in TOSSIM with the simulation speed set to real-time:
build/pc/main.exe -l=1.0 1
See the TOSSIM User Manual for more command options. You should
see similar output in the TOSSIM console:
Typing CTRL-C will terminate TOSSIM.
Simple Messaging Example
The following example illustrates messaging using the GenericComm component. The
example also demonstrates the use of a task.
We define a simple message structure in a header file. The payload of the message contains
the source identifier (TOS_LOCAL_ADDRESS) of the message sender and the sequence number of the
message. In addition to defining the structure of the message, we must assign the message a
unique AM_TYPE. This AM_TYPE is used in conjunction with the parameterized messaging
component.
Message header file (message.h)
|
//we must assign an AM_TYPE to the message
enum{
   AM_SIMPLEMSG = 55
};

typedef struct SimpleMsg
{
   uint16_t sourceId;
   uint16_t sequenceNo;
}SimpleMsg;

typedef SimpleMsg *SimpleMsgPtr;
|
When defining the AM_TYPE, the name must be of the form AM_'MYMSG' where 'MYMSG' is the name
of the message struct capitalized. The AM_TYPE for all messages in your application must be unique. We also define
a pointer for the message type as a convenience. If you are not familiar with unsigned types (e.g. uint8_t), there are many
online resources describing them.
top-level configuration file (SimpleMessage.nc)
|
includes message;

configuration SimpleMessage {
}
implementation {
	components Main, SimpleMessageM, GenericComm, TimerC;
	Main.StdControl -> SimpleMessageM.StdControl;
	Main.StdControl -> GenericComm;
	Main.StdControl -> TimerC;

	//messaging
	SimpleMessageM.RcvSimpleMsg -> GenericComm.ReceiveMsg[AM_SIMPLEMSG];
	SimpleMessageM.SndSimpleMsg -> GenericComm.SendMsg[AM_SIMPLEMSG];

	//timer
	SimpleMessageM.SendTimer -> TimerC.Timer[unique("Timer")];
}
|
In the configuration file, we include (includes message;) the message header file. The AM_TYPE is
used in two wirings.
In the implementation module we declare the use of the ReceiveMsg and the SendMsg interface. Looking back
at the configuration, we see that GenericComm component provides both of these interfaces. Notice that we have defined variables to
be used by the program. In particular, not the variable out of type TOS_Msg. TOS_Msg is the actual message structure
that is sent over the radio. TOS_Msg has a member named data. The message type you define must be able to fit in data.
That is, the message type you define cannot be larger than 29 bytes. You may have noticed that we made the source identifier a member of
our message structure. This is necessary (if you want to know who the message is from) as TOS_Msg does not include the source as part of the
header information (TOS_Msg is defined in tos/types/AM.h).
top-level implementation module (SimpleMessageM.nc)
|
module SimpleMessageM {
	provides {
		interface StdControl;
	}
	uses {
	        interface ReceiveMsg as RcvSimpleMsg;
	        interface SendMsg as SndSimpleMsg;

	        interface Timer as SendTimer;
	}
}
implementation {
        enum {RADIO_BUSY=0, RADIO_FREE=1};
        uint8_t txState;
        TOS_Msg out;
        uint8_t sequenceNo;

	command result_t StdControl.init() {
	    txState = RADIO_FREE;
	    sequenceNo = 0;
	    dbg(DBG_USR1,"SimpleMessage initialized\n");
	    return SUCCESS;
	}
	command result_t StdControl.start() {
	    call SendTimer.start(TIMER_REPEAT,512 + TOS_LOCAL_ADDRESS * 1024);
	    dbg(DBG_USR1,"SimpleMessage started\n");
	    return SUCCESS;
	}

	command result_t StdControl.stop() {
	    call SendTimer.stop();
	    return SUCCESS;
	}


	task void sendSimpleMsg() {
	    SimpleMsgPtr simpleMsgPtr;
            result_t retval;
            simpleMsgPtr = (SimpleMsgPtr)(out.data);
            simpleMsgPtr->sourceId = TOS_LOCAL_ADDRESS;
            simpleMsgPtr->sequenceNo = sequenceNo++;
            retval = call SndSimpleMsg.send(TOS_BCAST_ADDR,sizeof(struct SimpleMsg),&out);
            if (retval != SUCCESS) {
              atomic {
                 sequenceNo--;
                 txState = RADIO_FREE;
              }
              dbg(DBG_USR1,"Failed to queue message for send\n");
            }
        }

        event result_t SndSimpleMsg.sendDone( TOS_MsgPtr pmsg, result_t success ) {
            uint8_t sn;
            atomic {
              txState = RADIO_FREE;
              sn = sequenceNo - 1;
            }
            dbg(DBG_USR1,"Sent message \%x \n",sn);
            return SUCCESS;
        }

        event TOS_MsgPtr RcvSimpleMsg.receive(TOS_MsgPtr pmsg) {
           SimpleMsgPtr mptr = (SimpleMsgPtr)(pmsg->data);
           dbg(DBG_USR1,"Received messsage \%x from source \%x \n",mptr->sequenceNo,mptr->sourceId);
           return pmsg;
        }

	event result_t SendTimer.fired() {
	   if(txState == RADIO_FREE) {
	      atomic {
	         txState = RADIO_BUSY;
	      }
	      dbg(DBG_USR1,"Posting task to send message\n");
	      post sendSimpleMsg();
	   }
	   return SUCCESS;
        }
}
|
Two new concepts are demonstrated in the above implementation module. We use a task to implement the sending of a message. You can find out more about
tasks, events and commands in the NesC Language Reference Manual. As all variables defined outside an event, task or command are global to component, you may have to control access to them using an atomic block. In the above module, access to out is controlled using the variable txState. All potentially unsafe changes to txState occur in an atomic block. You can find out more about TinyOS concurrency in the NesC Language Reference Manual.
Makefile
|
COMPONENT=SimpleMessage
include ../Makerules
|
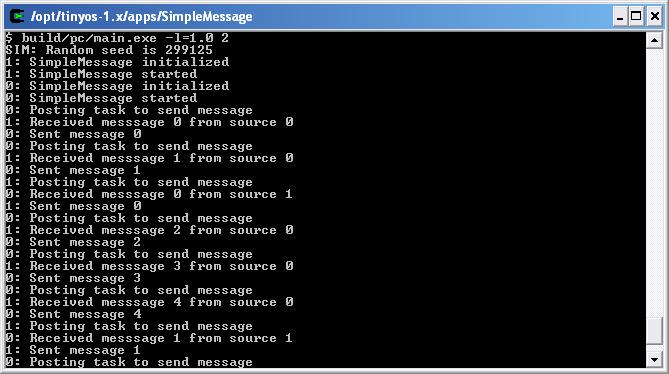
When run, SimpleMessage produces the following output: